이번 장에서는 openCV에서 어떤 타겟을 마치 정면에서 본 듯 만들 수 있는 투영 변환에 대한 글을 작성하겠다
이전 장에서도 이용했던 mouse_events를 이용한다
import cv2

class MouseEvents:
    def __init__(self) -> None:
        self.points = []

    def left_button_down(self, x, y, frame):
        self.points.append([x,y])
        cv2.circle(frame, (x,y),5,(0,0,255),-1)
        cv2.imshow('origin',frame)
        print(x,y)

    def right_button_down(self,x,y, frame):
        self.points.pop()
        print(x,y)

    def onMouse(self, event, x, y, flags, img):
        if event == cv2.EVENT_LBUTTONDOWN:
            self.left_button_down(x,y, img)
        elif event == cv2.EVENT_RBUTTONDOWN:
            self.right_button_down(x,y,img)
1. 원근(투영) 변환 - perspective (projection) transform
- 원근
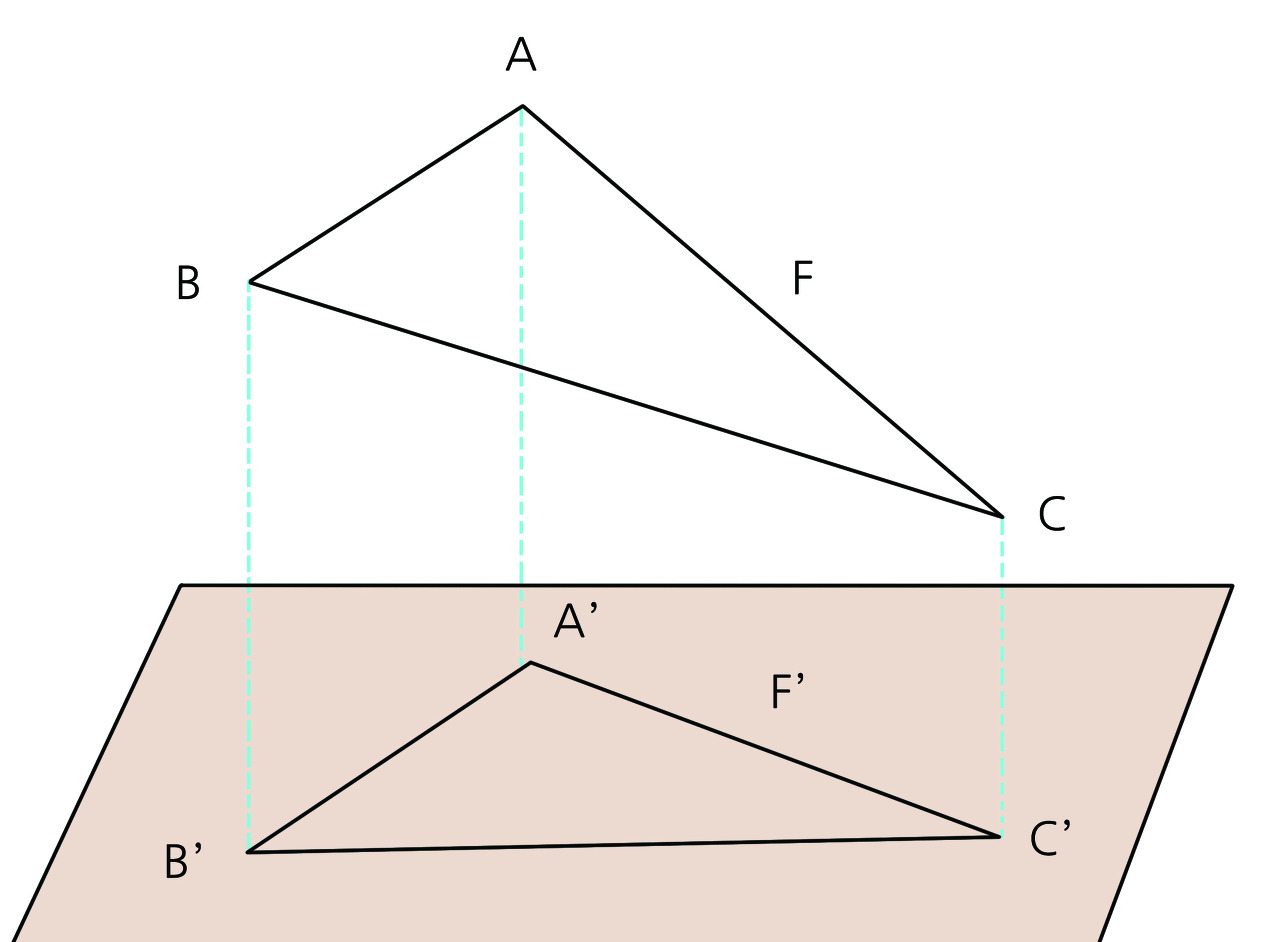
일반적으로 사람들이 2차원 화면에서 어떤것이 더 멀리 있는지 인식하는 방법은 원근법을 이용한 것이다 가까운 것은 크게, 멀리 있는 것은 작게, 자신의 초점이 있는 곳을 기준으로 한 점으로 모인다 - 투영이란
도형이나 입체를 다른 평면에 옮기는 일 - 우리가 진행할 문제는 이미지에서 원하는 부분의 원근감을 없에는 문제이다.

2. opencv perspective transform
import cv2
import numpy as np

from mouse_events import MouseEvents

POINTS_CHECK = False
# 좌표점은 좌상->좌하-> 우상 -> 우하
# 변경할 좌표를 4x2 행렬로 전환
# 이동할 좌표를 설정
mouse_events = MouseEvents()
mouse_events2 = MouseEvents()

path = 'images.jpg'
frame = cv2.imread(path)
height, width  = frame.shape[:2]
cv2.imshow('origin', frame)
if POINTS_CHECK != True:
    copy_frame = frame.copy()
    cv2.setMouseCallback('origin',mouse_events.onMouse, copy_frame)
    cv2.waitKey(0)
    # 원본 이미지에서 원하는 지점의 좌표
    source_coord = np.float32( mouse_events.points )
    # H와 W 는 새로 생성될 이미지(destination_coord)의 크기를 선택한 지점의 상하좌우 최대값으로 넣기 위해 구한다
    H = max(mouse_events.points[2][0],mouse_events.points[3][0]) - min(mouse_events.points[0][0],mouse_events.points[1][0])
    W = max(mouse_events.points[0][1], mouse_events.points[1][1], mouse_events.points[2][1], mouse_events.points[3][1] ) - min(mouse_events.points[0][1], mouse_events.points[1][1], mouse_events.points[2][1], mouse_events.points[3][1] )
    # 변환 이미지에서 원하는 지점의 좌표 ( (0,0) ~ (W,H)로 변환 )
    destination_coord = np.float32( [ [0,0], [0,H], [W,0], [W,H] ] )
    # 원본 -> 변환 미지수 8개를 구한다
    M = cv2.getPerspectiveTransform(source_coord, destination_coord)
    # 변환 -> 원본 미지수 8개를 구한다
    M2 = cv2.getPerspectiveTransform(destination_coord, source_coord)
	# 원본 -> 변환의 역행렬을 구한다
    INV_M = np.linalg.pinv(M)


transformed = cv2.warpPerspective(frame, M, (W,H))
cv2.imshow('transformed', transformed)- opecv에서는 간단하게 원근변환을 할 수 있게 해주는 getPerspectiveTransform 함수와 warpPerspective 함수를 제공한다
getPerspectiveTransform은 이용을 하자면 미지수를 구하는 단순한 수학 계산이다. 사용하기 위해서는 해당 점이 이동할 위치를 알고 있어야 한다 또한 사용상 원하는 지점의 좌표를 선택할 때 좌상, 좌하, 우상, 우하 순서대로 입력해야 한다. - cv2.warpPerspective(frame, M, (W, H))
첫 번째 파라미터로는 사용될 이미지의 데이터가 들어간다
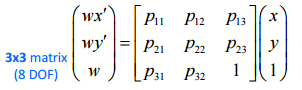
두 번째 파라미터 M 은 getPerspectiveTranform을 통해 구한 변환 행렬이 들어간다 ( 아래 행렬식에서 P들이 M이 된다)
세 번째 파라미터는 결과로 나오는 이미지의 높이, 넓이이다

- MouseCallback을 이용하여 원하는 영역의 꼭짓점 4개를 선택한 후 아무 키나 눌러 진행한다


3. 역변환
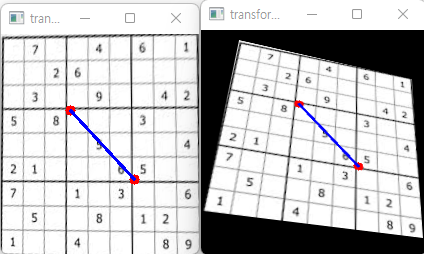
- 만약 변환된 이미지에서 특정 좌표가 원본 이미지에서 어느 지점인지 알고 싶다면 어떻게 할 수 있을까?

- 위 사진과 같이 변환된 이미지에서 파란 선의 좌표가 원본 이미지에서 어느 지점인지 알기 위해서는 이전에 구한 변환에 사용한 행렬의 역행렬을 구하여 변환 이미지에서 원하는 지점의 좌표와 행렬 곱해주면 된다
if POINTS_CHECK != True:
    cv2.setMouseCallback('transformed',mouse_events2.onMouse, transformed)
    cv2.waitKey(0)
    line_coord = np.float32(mouse_events2.points)
    One = np.squeeze(INV_M @ np.expand_dims(np.append(line_coord[0], 1), axis=1))
    Two = np.squeeze(INV_M @ np.expand_dims(np.append(line_coord[1], 1), axis=1))
    One = One[:2] / One[2]
    Two = Two[:2] / Two[2]

    POINTS_CHECK = True

cv2.line(transformed, line_coord[0].astype(int), line_coord[1].astype(int), (255,0,0),2,1)
cv2.line(frame, One.astype(int), Two.astype(int), (255,0,0),2,1)

dst2 = cv2.warpPerspective(transformed, M2, (height, width))
cv2.imshow('transform2', dst2)

cv2.imshow('origin', frame)
cv2.imshow('transformed', transformed)
cv2.waitKey(0)- 행렬곱은 간단하게 @를 이용하여 구할 수 있다.
- 행렬의 길이가 서로 다르니 맞추기 위해 np.append로 값 1을 넣었다 그 후 하나의 차원을 추가해 3x1의 차원을 가지도록 만들었다 ( 3x3 @ 3x1 )
- 위의 결과로 나온 One 은 wx, wy, w 형태이다 ( 위의 공식 참고 ) 그렇기 때문에 원본의 x, y를 구하기 위해서는 w를 구하여 나누어줘야 한다.
- M = P11 ~ P 32
- 원하는 지점 = x, y를 x, y, 1로 변경
- One = (wx`, wy`, w)
위의 공식을 잘 이해하고 있다면 무리 없이 진행할 수 있다. 복잡한 수학 계산은 컴퓨터가 해주니 공식을 가지고 사용하면 된다!
'Machine Learning > Computer Vision' 카테고리의 다른 글
| (2) OpenCV C++ - image 결합, 외곽선 검출 (0) | 2023.09.13 |
|---|---|
| (1) OpenCV C++ - 기초 ( imread, imshow, cvtColor, resize) (0) | 2023.09.08 |
| (에러를 딛고 깨달은) opencv perspective transform 후 선 그린 후 원본에서 해당 선의 위치 구하기 - 역변환 하기, 점 변환 (0) | 2022.03.10 |
| (10) OpenCV python - 색상 범위 추출 - inRange (0) | 2021.11.27 |
| (9) OpenCV python - 마우스 동작 함수 - setMouseCallback (0) | 2021.11.21 |


